Epson Scan does not start since I upgraded to Windows 10. What should I do?
-
You need to reinstall Epson Scan. Follow the instructions below.
Reinstall Epson Scan
Note: If your product is connected with a USB cable, turn off the product and disconnect any interface cables.
- Select
 >
>  > Apps.
 - Under Apps & features, select EPSON Scan > Uninstall and follow the on-screen instructions to uninstall Epson Scan.

- Go to the Epson Support page and search for your product.
- Select Downloads > Drivers and download the Scanner Driver and EPSON Scan Utility. Install the software.
- Go to the next section.
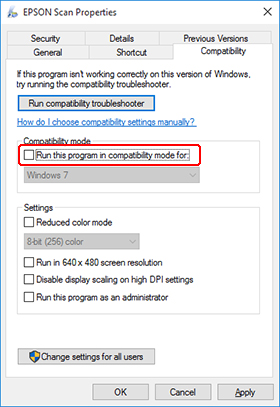
Verify Epson Scan is not set to Compatibility Mode
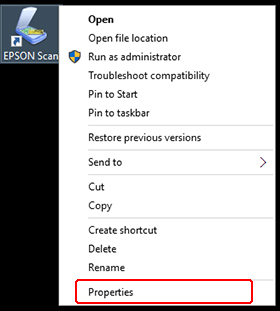
- Right-click the EPSON Scan icon on the desktop and select Properties.
- Select the Compatibility tab. Uncheck Run this program in compatibility mode for, if necessary, and select OK.
- Select , enter services in the search box, and then select Services Desktop app.

- Double-click Windows Image Acquisition (WIA).
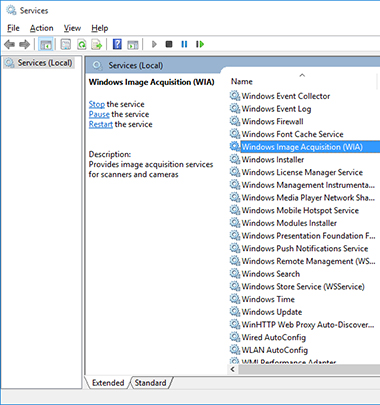
- Confirm the Startup type is set to Automatic and Service status is set to Running. If the Service status is not set to Running, select the Start button and select OK.

- Go to the next section.
Configure Epson Scan for Your Connection
- Do one of the following:
- USB: Turn on your scanner and connect the USB cable from your scanner to the computer. You're done; you can skip the remaining steps.
- Ethernet or Wireless: Select > EPSON > EPSON Scan Settings.
- Select Network and select Add.
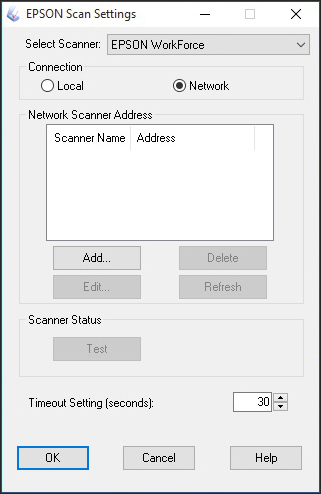
- Select the IP address for your product and select OK.

- Select OK again.
- Select
Published: Jul 23, 2015
Was this helpful? Thank you for the feedback!